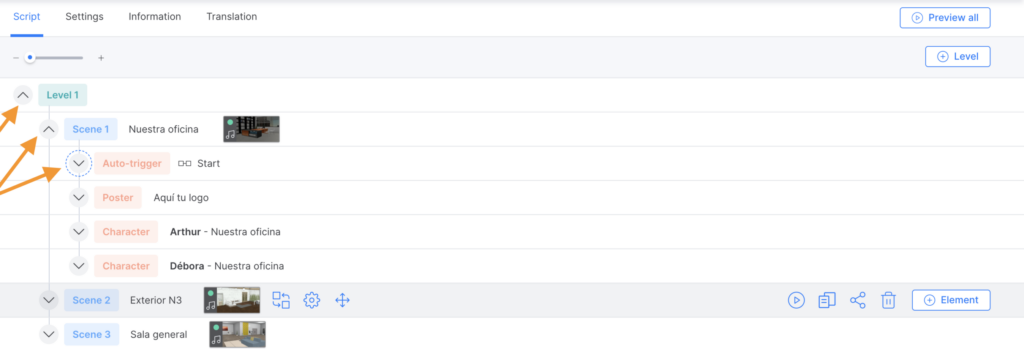
Basic controls of the Script tab
The “Script” tab is where you are going to spend most of your time while building your game.
A game built in the Editor is composed of Levels, Scenes, and Elements. Each Element in a Scene can, in turn, be the trigger for a Flow. A Flow is a chain of building blocks. These building blocks define the action of the game. See more on structure below
Creating from scratch or using a template
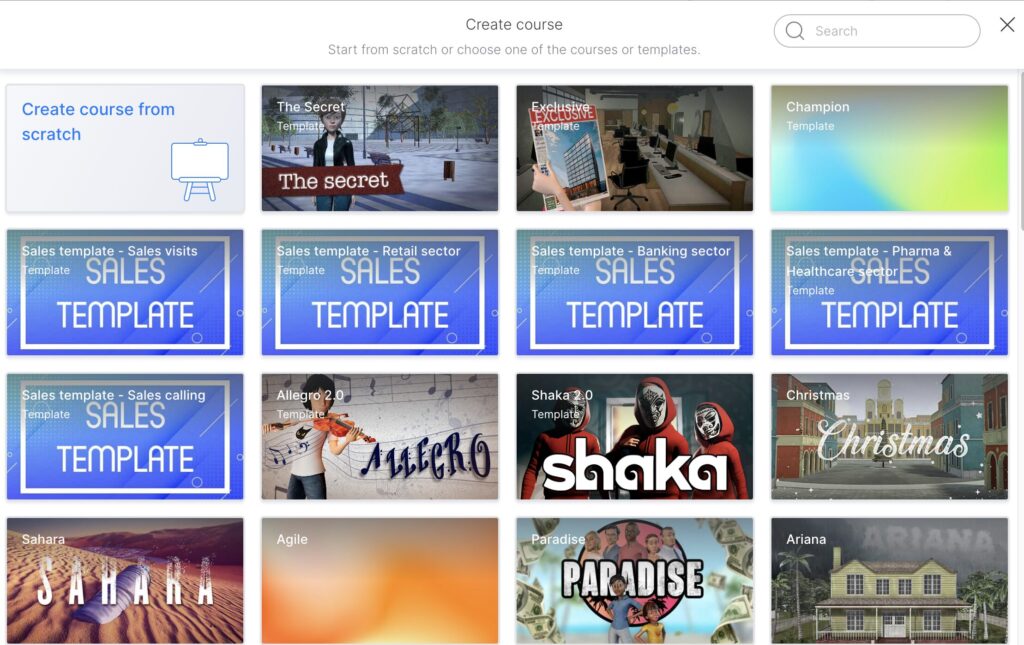
When you click on the “Create course” button, the first option you will be given is:
- To create a game from scratch or
- To use one of the provided template games or
- To use an existing game as a template
When you create a game from scratch, a structure of 1 level and 1 scene is created automatically. You can immediately start setting up this scene and add as many levels and scenes as you want. See the section creating a scene for more details.
When you choose a template to create your game, you will see a fully built game in the script tab. The template games are fully developed stories into which you can add your learning content. Use the corresponding guide for each template, to know what building blocks we recommend you customize.
You can also use any existing game in your catalog as a template. This allows you to make a new version of this game with changes to the content or with different branding inside, for example.
Be careful: When using a template, you are free to add and remove scenes, levels, elements and building blocks but be careful to maintain a story that makes sense. Follow the guides carefully to avoid errors.
Basic Structure of a game
Levels are like periods of time in your game. Your player will go through the levels in order, never skipping one, and never going backward.
Scenes are like physical places in your game. You can design it so that the player moves from scene to scene in any order, including returning to scenes several times, but only within the same level.
Elements are characters, objects, etc that you can add to the scenes. Clicking on an element is how the player interacts with the game. Clicking on an element will launch the building blocks attached to it. This is called a Flow.
A Flow is a series of events or actions that happen when a player clicks. Flows happen only once unless configured to be repeatable. The player will experience the flow of blocks in the order they are positioned.
The interface
- Click “+ Level” to add new levels to your game. The new level will be added at the end of the game. If you want to add a level between existing levels simply create a new one and copy and paste it to the position you want. See below for more details.
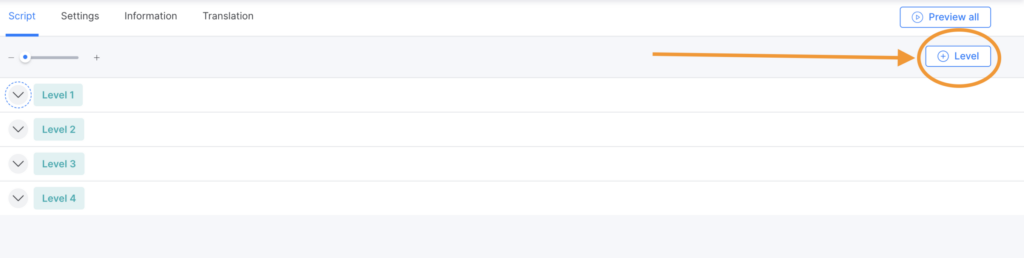
Note: The position of a level is important, as the levels will be played in order.
- Click “+ Scene” to add new scenes to your game. Hover the mouse over the Title bar of the level where you want to add a scene for the button to appear. The new scene will be added at the end of the level. To move it you can copy and paste.
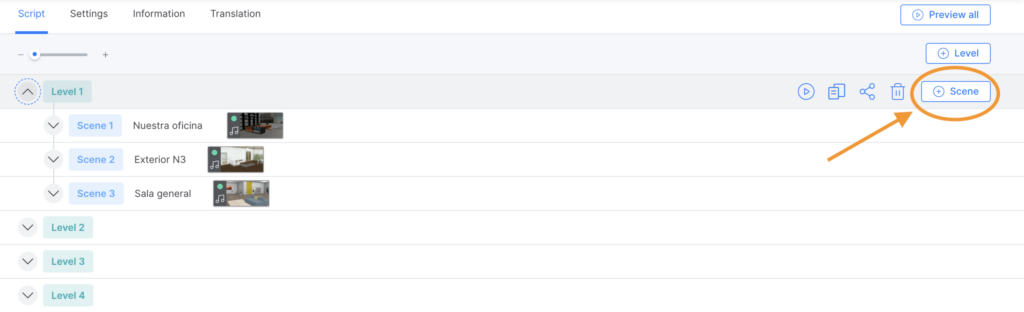
Note: Only the position of the first scene in each level is important. From there the player will move from scene to scene as you have designed it, in any order.
- Click “+ Element” to add new elements to your game. Hover over the title bar of the scene where you want to add an element for the button to appear.
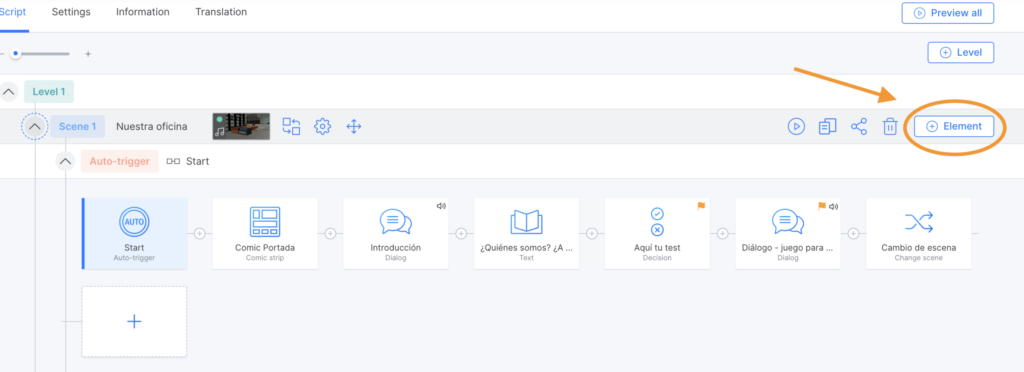
Note: Elements will appear on the script in the order they have been created. This order is not related to how the player will interact with them.
- Click on the arrows to expand and collapse each section.
Previewing your game
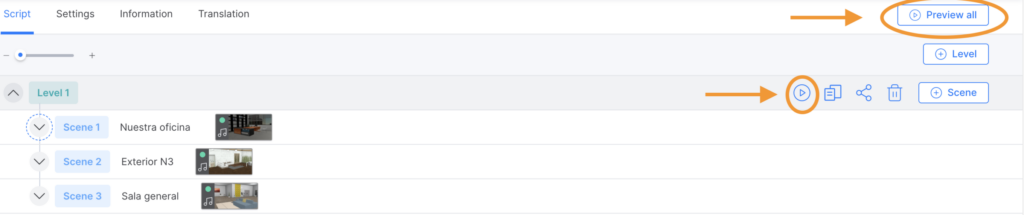
You can preview the game you are building at any time.
You can preview the whole game by clicking on the button preview all at the top right corner.
You can also start previewing from any level, scene, element or building block.
Be careful: if you preview from a specific level, scene, element or building block, take into consideration that the game may behave differently (i.e. an object that has not been collected previously cannot be used, a new level is not accessible because one or more mandatory building blocks have not been played…).
Note: You can also create an external link to the preview, in order to share all or part of your game with stakeholders. For more info on how that works click here.
Copying, pasting, deleting levels and scenes
Editor allows you to copy scenes and even full levels so that you can reuse them in another part of your game. This function will create a duplicate scene with all elements positioned in it, but will not duplicate the building blocks. You can also use this function to move a scene from one level to another. For example: If we want our character to come back to the same scene at the end of each level, we would want the same background and characters in that scene, but we want different things to happen there.
Note: you can also copy and paste most of the building blocks. Click here to see how.
To copy and paste a level:
- Click on the copy button on the title bar of the level you want to copy.
- You will see plus symbols appear along your script.
- Click on the + symbol where you want to add the level.
- Click on paste to confirm.
To copy and paste a scene:
- Click on the copy button on the titles bar of the scene you want to copy.
- You will see plus symbols appear along your script.
- Click on the + symbol where you want to add the scene.
- Click on paste to confirm.
You also have the option to move the scenes within the same level by grabbing the drag icon at the far left of the Scene’s title bar.
To delete a scene or a level, click on the trashcan button on its title bar
Co-editing
In the script tab you can have multiple people working at the same time on the same game. You will see the icon of another creator on the top right corner. In order to avoid overwriting each other’s work, the building block they are working on will be highlighted in blue.
Using in-App help
In Editor, you can find 3 types of help:
1. Tutorial
Click on the yellow button “Tutorial” to access in-app information about the interface you are in (tabs, positioner, and building blocks).
2. Help
Click on the “?” button to access the following:
- Knowledge base
- Example games
- Gamelearn Academy
- Talk to an expert
3. AI assistant
You can get immediate help by clicking on the chat button at the bottom right. Our virtual assistant, Anna, will be able to answer your questions and, if necessary, transfer your request on to a human agent.

Search function in the script
Once you’re in the game, you’ll be able to search by item type, text, conversation, or other elements.
To do this, enter a keyword in the search bar at the top of the page. The system will highlight matching pieces, words or characters in blue and display them on the screen. You can also expand the different levels to view the results in more detail.