Translating your game
The Editor facilitates the translation of your game into over 20 languages allowing you to scale your audience globally. When you have completed, activated and published a translation for a game the player will automatically be given the option to choose the language when they start to play.

Note: To save time, before you start to translate your game, be sure that you have tested and checked your content and only translate the final version of your game.
Be careful: Auto-save is not set up on the translation tab. Don’t forget to frequently click on the “Save” button. Likewise, if you make a mistake you can simply leave the tab without saving and it will revert to the last saved version.
To make your game available in another language you have 2 options
- work on the translation directly in the Editor’s inteface, or
- download the text content in a .JSON file and upload its translated version.
Translating directly in Editor’s interface
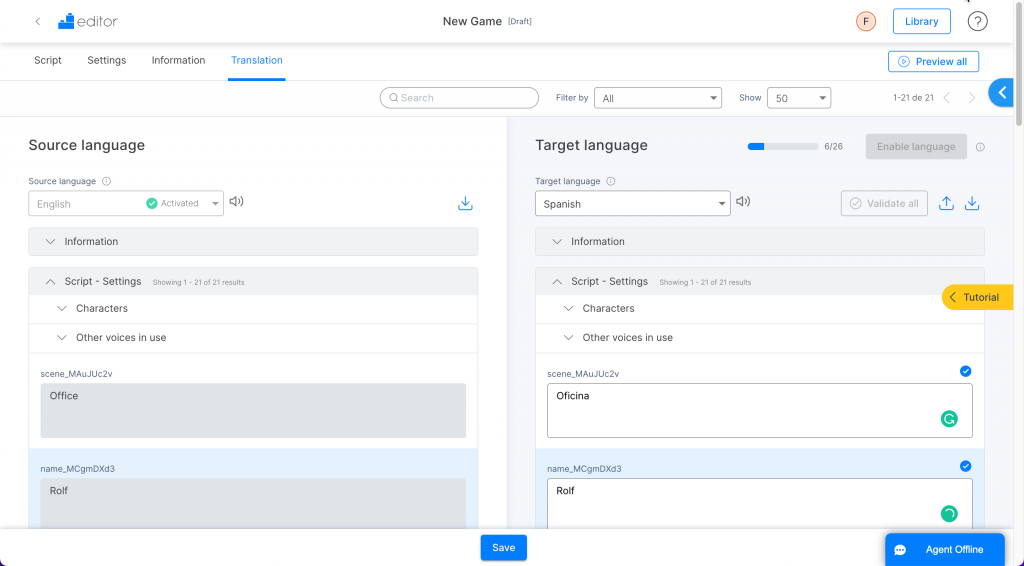
- Go to the translation Tab and select the target language on the right-hand panel.
- Then simply enter the translated texts manually into the corresponding boxes of the Information and Script-Settings sections.
- Use the filter to see only the fields that are pending for translation or the ones that have been modified and need validation.
Be Careful: All media, images, documents you have added to your game will need to be validated. This is to track the translation of any documents or images that might contain text. You can use the filter to see only the documents too.
- When 100% of the fields have been translated you can click on “Enable language” and save the translation.
- Go out to the main Editor interface and find your game
- Click on update on the course card.
Your game will need to be republished by clicking on the Update button on the main Course card in Editor before your translation will be available to play.
Translating using a JSON file
- Go to the translation Tab and select the target language on the right-hand section..
- Click on the download icon to download the full script:
- A .json file will be downloaded. Using a translation tool that’s compatible with .json files, translate the file into the target language. A new .json file will be created with the translated game content.
- Come back to the translation tab of your game and on the right-hand section of the screen, select the target language.
- Click on the upload icon and choose the .json file you have just translated. You will immediately see your translated content in the fields below
- Use the filter to see only the fields that are pending for validation.
Be Careful: All media, images, documents you have added to your game will need to be validated. This is to track the translation of any documents or images that might contain text. You can use the filter to see only the documents too.
- When 100% of the fields have been translated you can click on “Enable language” and save the translation.
- Go out to the main Editor interface and find your game
- Click on update on the course card.
Additional steps:
- Look at the number of translated boxes at the top right next to the blue bar. If you see, for example, “1987/2002,” that means that there are 15 fields still to complete.
- Filter by “untranslated” to find any missing texts
- Filter by “documents” : Add any new PDF, image, audio or video or keep the original one by clicking on “use from source language”
- Filter by “modified” to review and validate the changes you made to your original game.
Important: Everytime you modify the game in its original language even if it’s just a comma, you will have to validate the changes in the translated languages.
- Use the “search” bar to look for any specific words you would like to check
Managing TTS voices in a translation and localizing characters’ names
If you have used text-to-speech in your original game you also need to select new voices for your characters in the target language.
Note that Text-to-speech is only available for Spanish, English, French and German for now.
Change the characters’ names and voices:
- In the Characters section, click on Settings
- Select a voice for each character in each language.
- Optionally, change the character’s name for different languages.
Note: You can check the settings tab to see the status of the different languages you have translated your game into.
Be Careful: Even if your game is 100% translated, you will have to “Enable the language”, “Save” and “Publish” / “Update the publication” for your players to access the language you have translated your game into.
Previewing the translation of a game
Once the game has been translated and saved, it is recommended to test the translated version.
To preview the translated version of your game:
- Click on the “preview all” button
- In the previewed game click on the settings button in the menu (bottom-right corner)
- Select the language you want to play in
Note: You can also directly change the language in the url, by changing the 2 letter code corresponding to the language (lang=es, lang=en, lang=fr, lang=de, etc.)
