Personalizing your game
You can customize your game by adding your own logo and images directly into the 3D scenes. Here are some examples of how you can personalize the environment within your game:
- put your company logo on the wall of the office reception scene or on top of the exterior of a building
- put a picture of your CEO on the wall of the waiting room
- put posters of your company values on the walls of your virtual office
- use a photo of your warehouse as the background for a scene
- use a photo of a real person as a character in a dialog
Adding your logo to a scene:
- Add an element and select “poster”
- Select the image in the library or upload the image from your computer
- Position the logo, ideally on a wall
- Name the poster and click on the “Save” button
Tip: For your convenience, Posters will appear parallel to the surface behind them in the scene. This means it should line up well with the wall, without needing rotation.
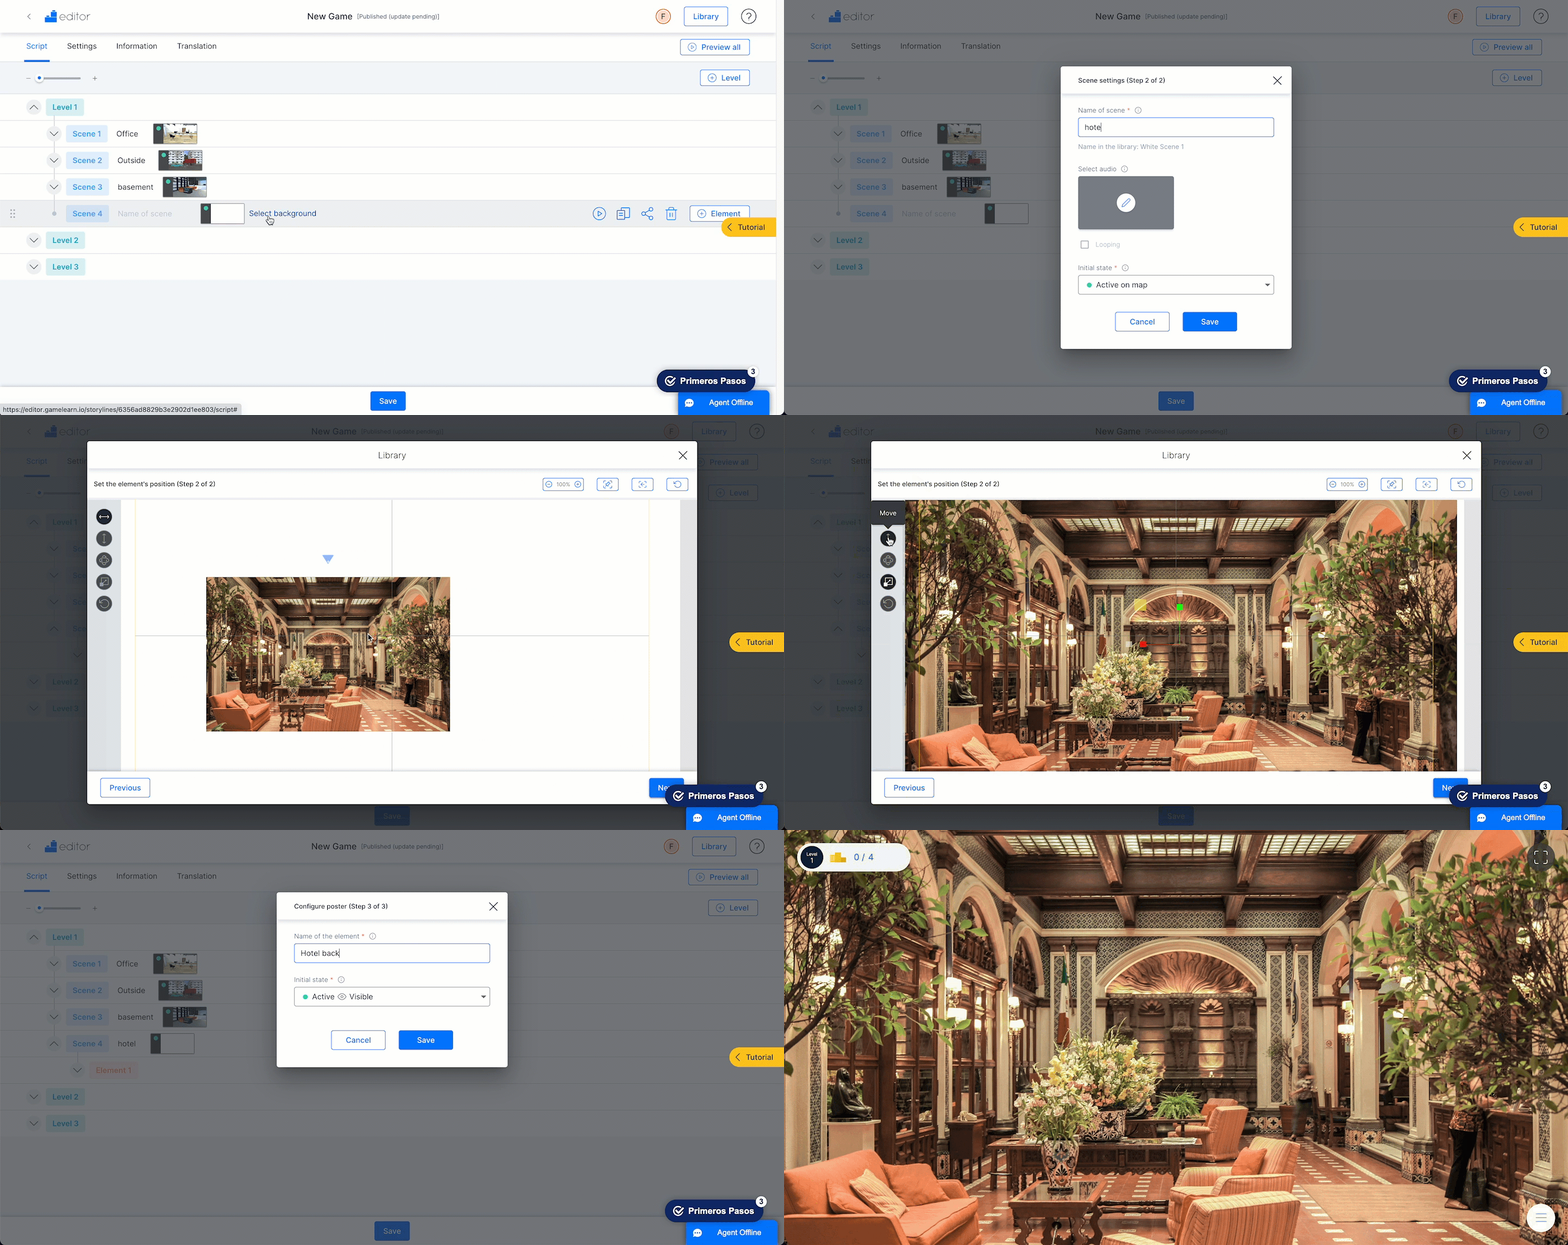
Using your own images as backgrounds for a scene
There are hundreds of 3D scenes available in the library for you to build your game. But you also have the option to use 2D images as the background of a scene. This way you can use a photo of your company’s lobby or breakroom, for example
To add a 2D image as the background of a scene:
- Add a scene
- From the library, select the scene called “White scene 2” as the background
- Name the scene and click on the “Save” button
- Add an element “Poster”
- Select the image in the library or upload the image from your computer
- Drag the image towards you, just until you can see it on the screen i.e. when it is visible in front of the backdrop.
Tip: Avoid pulling the image too far forwards as you will lose the depth of space for placing your characters, objects and other elements.
- Select the resize tool, and enlarge the image until it covers the whole screen
Be careful: Images you use as a background of a scene must have a high resolution.
- Click on Next
- Name the poster and click on the “Save” button
Be careful: This method causes you to lose a certain amount of depth in the scene. You will notice that characters and objects added later will probably need to be resized to appear in proportion to the background.
Tip: Consider using a comic or cartoon filter on your image to give it the same feel as other 3D scenes.

Changing a character’s clothes
Amongst the hundreds of 3D characters available in the library, many have been created multiple times as the same avatar but in different clothes (business, casual, sportswear…).
You cannot customize a 3D character yourself but you can select the avatars who are the same but dressed differently to “change its clothes” if needed. For example, you can have a character dressed casually in a scene when they are at home and have them dressed for work in a different scene.
Using images in dialogs
The “Dialog” building block has two display modes;
- window view: If you select the window view, the dialog will appear in the foreground, with a grey-coloured background. Use this to depict a conversation that happens elsewhere or simply to give visual variety.
- stage view: If you select the stage view, the player will see the conversation play out in the same view of the scene. This view gives a more immersive experience to the player as the conversation flows in the same scene view.
For window view the background image of the dialog can be customized:
- Enter the “dialog” building block by clicking on the pencil icon
- Ensure you have selected the window display mode
- A background image selector will appear below the display mode dropdown
- Click on the “pencil icon” and the library will open
- Select the image or upload one from your computer
- Save the building block
Tip: You can grab a screenshot from anywhere in your game to use as a background image
You can also customize the dialogs by using 3D objects or any of your own 2D images, instead of a character in the conversation.
To achieve this:
- Enter the “dialog” building block by clicking on the pencil icon
- In each line of dialog to add the character who’s speaking click on one of the pencils and the library will open
- From the dropdown at the right change from characters to objects or images
- Choose the image or object you would like to be represented in the dialog.
- When you’re done writing the dialog click save.
See examples below of a dialog with objects and images for participants in the conversation
Example of a 3D object and an image in Window view:
Example of an image in Stage view:
