Managing the campus
Browse the Gamelearn catalog
Anyone can learn by playing with Gamelearn. There’s no need for prior knowledge on the subject or experience playing video games. Gamelearn courses are intuitive, even for people who have never played video games before. The simulation also allows the difficulty to be adapted to each user.
To browse the catalog, follow these steps:
- Log in to Admin.
- Click on “Campus” in the left-hand side menu and then click on ” Courses”.
Tip: Use filters to find your courses
You can use the existing filters to find your courses faster:
- Click on “Campus” in the left-hand menu, then”Courses.”
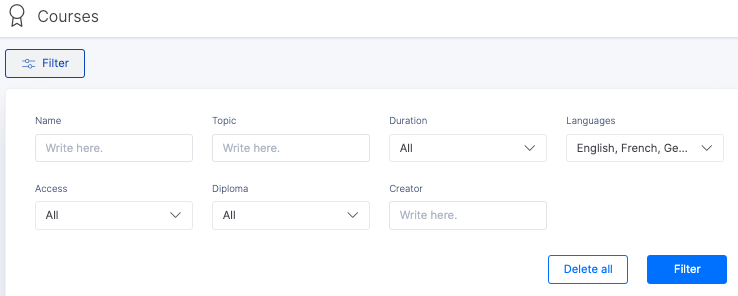
- Click on the filter button and choose your desired filter(s):
- Course name
- Topic
- Type of access
- Diploma availability
- Duration
- Creator
- Language
Note: the “default” setting will automatically apply to all newly released courses as well as access to your catalog. However, if you’ve edited the visibility and access for a specific course, it will have its own custom settings and the “default” settings will no longer apply.
For more information on the games available, follow this link: https://www.game-learn.com/en/catalog/
Check availability of courses and languages
Our courses are available to play in several languages (including Spanish, English, French, and German).
To check the availability of courses and languages, follow these steps:
- Log in to Admin.
- Click on “Campus” in the left-hand side menu and then click on ” Courses”.
- Click on “View/Edit” in the course that interests you.
You can check which languages the games are in and their duration here.

For more information on the games available, follow this link: https://www.game-learn.com/en/catalog/
For full details and to confirm availability in your language, please contact us and let us know which game and language you’re interested in.
Preview your students’ Campus from Admin
From the Admin, you have the option to preview the Campus to see how your students see it and to confirm that you have the view and access set according to your needs.
To do so, follow these steps:
- Click on “Campus” in the left-hand side menu and then click on ” Courses”.
- Select the “Preview Campus” option at the top right of your screen.

Remember that you’ll also be able to view the itineraries created in addition to the courses.
Configuring the (default) access mode for courses on the Campus
From the Admin, you can define how you want your students to view the courses on the Campus by setting a default access mode.
Steps
To configure the default visibility and access mode for the courses, follow these steps:
- Click on your name’s initial, found in the top right corner.
- Click on “My account.”
- Go to the “Settings” tab.
- Scroll down to the “Access to courses and diploma” section.
- Use the drop-down menu and select the “Make courses visible for” option.
- Choose your desired option:
- All students: accessible to all students with access to the Campus.
- Only classes: course cards will be visible to all students on the Campus but only playable to students enrolled in a class.
- No one. Not visible on the Campus: the course cards will not be visible on the Campus to any student; no one will have access to them.
7. Save changes.
Configuring the (individual) access mode for a course on the Campus
If you prefer, you can configure the visibility and access mode for a specific course or for several at once. Just follow these steps:
Specific course
- Click on “Campus” in the left-hand menu, then “Courses.”
- Hover over the tab of the course you want to configure and click on the “View/Edit” option.
- Choose your desired mode in the “Configuration” drop-down menu.
*You can choose the option you have in the “default” state.
- Save changes.
Several courses at once
- Click on “Campus” in the left-hand menu, then “Courses.”
- Hover over one of the course cards and select it.
- Select more courses by clicking on them. You can also select all courses with the option that shows how many are selected.
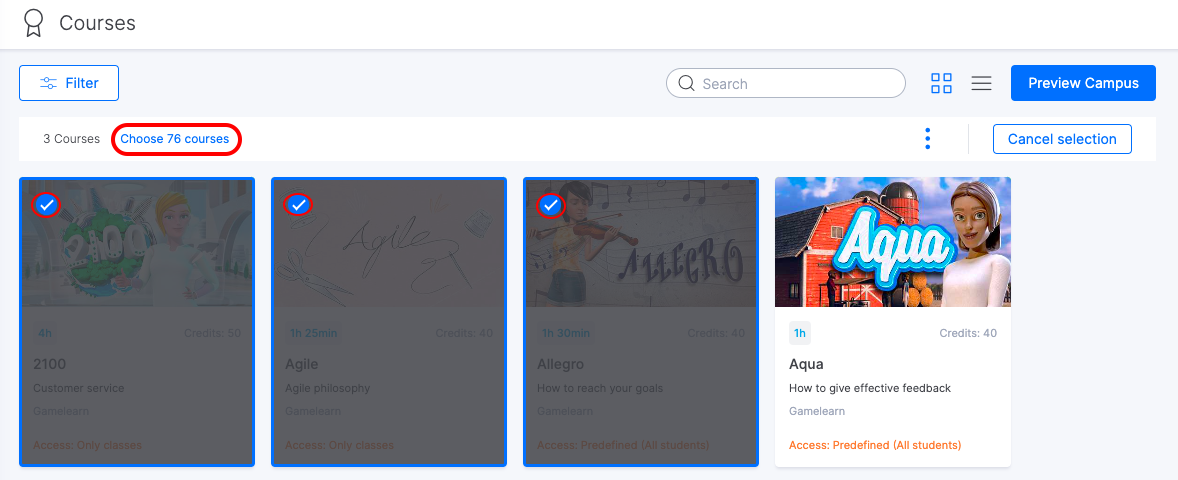
- Click on the three dots at the top right.
- Choose the “Change Access” option.
- Choose the mode you want from the drop-down menu. *You can choose the option you have in the “default” state.
- Save changes.
On each card, you’ll see a legend with the access mode configured for that particular course.
Remember: there may be some “withdrawn” courses. This will be indicated on the withdrawn course card so that it can be located.
Confirming diploma availability for courses (default)
To set default diploma availability, follow these steps:
- Click on your name’s initial, found in the top right corner.
- Click on “My account.”
- Go to the “Settings” tab.
- Scroll down to the “Access to courses and diploma” section.
- Use the drop-down menu and click “Generate diploma in.”
- Choose your desired option:
- All courses and learning pathways.
- No course or itinerary.
- Save changes.
Confirming diploma availability for courses (individual)
You can change the settings for downloading diplomas for all games—both individually for a specific course and for groups of several of them. To do so, follow these steps:
Specific course
- Click on “Campus” in the left-hand menu, then “Courses.”
- Find the tab for the course you want to configure and hover over it.
- Click on “View/Edit”.
- In the “Settings” section, check the box that says “Generate a diploma when the student completes the course”
Several courses at once
- Click on “Campus” in the left-hand menu, then “Courses.”
- Hover over one of the course cards and select it. Then, select more courses in the same way. You can also select all courses with the option that shows how many are selected.
- Click on the three dots at the top right.
- Choose the “Generate diploma” option.
- Choose the mode you want from the drop-down menu. *You can choose the selected courses or no course.
- Save changes.
- If the box “Generate diploma when the student completes the course” is ticked, students will be able to get their diploma through the “My progress” section within the Campus.