Exporting and saving reports from the Admin
Export enrollment list
The enrollment list report will likely be the most flexible and useful one. This option allows you to search for the points history of all the students you’ve had in your classes as well as see who has connected over the last few days. You can also view the comments, progress, and status of your students.
Steps
To access and export the information, follow these steps:
- Click on the “Reports” section in the left-hand side menu of the Admin.
- Select the “Enrollment List” option.
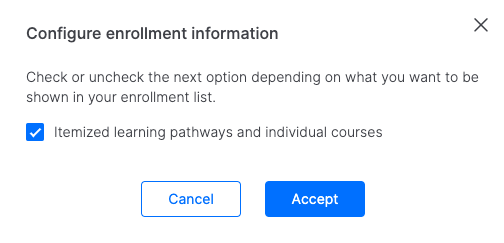
- If you like, you can choose which information will be shown via the “Report setup” option found in the “three dots” menu at the top right. Checking “Show itemized learning pathways and individual courses” adds a column that allows you to see which courses —modules— make up a learning pathway.
You’ll have default filters you can select to your liking.
- Select the columns you want to appear in your report.

- Sort the columns by clicking on the filter symbol.

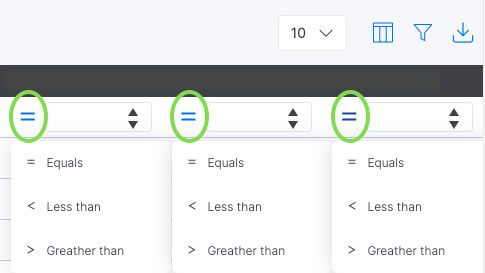
- Use the drop-down menu to filter the fields by whichever option you want: “greater than,” “less than,” or “equal to.”

- Export the report using the “Export” option.

| ℹ️ Remember you can: Export current page: only what’s visible on the current page will be downloaded. Export all: the entire report will be downloaded. |
| ℹ️ ️ Download reports: If you manage several accounts of your client: you’ll be able to select the account in which you need to download the different reports from the drop-down menu at the top left. Reports from two accounts cannot be downloaded together.If you manage several clients: when accessing the reports you’ll be able to see the information of all your clients and can filter by the client. |
| ℹ️ Remember that the information that’s downloaded will be the last update that appears. |
See class reports
Using the available filters (game, language, dates), the class report offers a universal report of all student progress so you don’t have to check each class’s progress one by one. The information is the same as you’ll find in the “Progress” tab found in any one of your classes. You can filter by column to generate the report you need (filtering by course, dates, connection status, etc.).
Steps
To access and export the information, follow these steps:
- Click on the “Reports” section in the left-hand side menu of the Admin.
- Select the “Class Reports” option. You’ll have default filters you can select to your liking:
- Select the columns you want to appear in your report.
- Sort the columns by clicking on the filter symbol.
- Use the drop-down menu to filter the fields by whichever option you want: “greater than,” “less than,” or “equal to.”
- Export the report using the “Export” option.
| ℹ️ Remember you can: Export current page: only what’s visible on the current page will be downloaded. Export all: the entire report will be downloaded. |
| ℹ️ ️ Download reports: If you manage several accounts of your client: you’ll be able to select the account in which you need to download the different reports from the drop-down menu at the top left. Reports from two accounts cannot be downloaded together.If you manage several clients: when accessing the reports you’ll be able to see the information of all your clients and can filter by the client. |
| ℹ️ Remember that the information that’s downloaded will be the last update that appears. |
Export student reports
In the student report, you can see how many courses students have started and completed. You’ll also be able to see how many training hours each student has accumulated.
Steps
To access and export the information, follow these steps:
- Click on the “Reports” section in the left-hand side menu of the Admin.
- Select the “Student Report” option. You’ll have default filters you can select to your liking:
- Select the columns you want to appear in your report (the “Number of completed games” column allows you to see the amount of games your students have completed on their own or within a learning pathway).
- Remember you can use a temporary filter to get the information on hours played and courses started or finished during a specified period of time.

- Sort the columns by clicking on the filter symbol.
- Use the drop-down menu to filter the fields by whichever option you want: “greater than,” “less than,” or “equal to.”
- (i) For the column “Training hours,” you will need to enter the time using decimals (for example, to see who has played more than 30 minutes, enter 0.5).
- Export the report using the “Export” option.
| ℹ️ Remember you can: Export current page: only what’s visible on the current page will be downloaded. Export all: the entire report will be downloaded. |
| ℹ️ ️ Download reports: If you manage several accounts of your client: you’ll be able to select the account in which you need to download the different reports from the drop-down menu at the top left. Reports from two accounts cannot be downloaded together.If you manage several clients: when accessing the reports you’ll be able to see the information of all your clients and can filter by the client. |
| ℹ️ Remember that the information that’s downloaded will be the last update that appears. |
Video – Export enrollment, class and student list
Export survey reports
The survey report offers an overall report featuring feedback given by students who have finished.
It consists of 3 surveys:
- Score (NPS) – Kirkpatrick 1
- Impact and applicability – Kirkpatrick 3/4
- Self-evaluation – Kirkpatrick 2

“Score (NPS)” report
The “Score (NPS)” report allows you to obtain an overall report with the results of the comments received from learners who have completed a Gamelearn course. You can use the available filters to get a more accurate result (by game, class, user, and language). The information is the same as you’ll find in the “Surveys” tab in any of your classes:
- Applicability Rate
- Opinion (%)
- Recommendation rate
To access and export the information, follow these steps:
- Click on the “Reports” section in the left-hand side menu of the Admin.
- Select the “Survey reports” option.
- Choose “Score (NPS)”.
- Use the filters to obtain a more precise result (game, class, user, language).


- Sort the columns by clicking on the filter symbol.

- Use the drop-down menu to filter the fields by whichever option you want: “greater than,” “less than,” or “equal to.”
- Export the report using the “Export” option.

| ℹ️ Remember you have two options:Export current page: only what’s visible on the current page will be downloaded. Export all: the entire report will be downloaded. |
| ℹ️ Download reports: If you manage several of your client’s accounts, you’ll be able to select the account for which you wish to download the different reports from the drop-down menu at the top left. Reports from two accounts cannot be downloaded together.If you manage several clients: when accessing the reports you’ll be able to see the information of all your clients, and you can filter by client. |
| ℹ️ Remember that the information that’s downloaded will be the last update that appears. |
“Impact and applicability” report
The “Impact and applicability” report allows you to obtain an overall report with the results of the comments received by students who have completed a Gamelearn course and who, after four weeks, have responded to the applicability survey. You can use the available filters to get a more accurate result (by game, class, user, and language).
To access and export the information, follow these steps:
- Click on the “Reports” section in the left-hand side menu of the Admin.
- Select the option “Survey reports”.
- Choose “Impact and applicability”.
- Use the filters to obtain a more precise result (game, class, user, language).

- Sort the columns by clicking on the filter symbol.
- Export the report using the “Export” option.
| ℹ️ Remember you have two options:Export current page: only what’s visible on the current page will be downloaded. Export all: the entire report will be downloaded. |
| ℹ️ Download reports: If you manage several of your client’s accounts, you’ll be able to select the account for which you wish to download the different reports from the drop-down menu at the top left. Reports from two accounts cannot be downloaded together.If you manage several clients: when accessing the reports you’ll be able to see the information of all your clients, and you can filter by client. |
| ℹ️ Remember that the information that’s downloaded will be the last update that appears. |
“Self-evaluation” report
The “Self-assessment” report allows you to obtain an overall report with the results of the comments received from learners who have completed a Gamelearn course and responded to the PRE and POST survey. You can use the available filters to get a more accurate result (by game, class, user, and language).
To access and export the information, follow these steps:
- Click on the “Reports” section in the left-hand side menu of the Admin.
- Select the option “Survey reports”.
- Choose “Self-evaluation”.
- Use the filters to obtain a more precise result (game, class, user, language).
- Sort the columns by clicking on the filter symbol.
- Use the drop-down menu to filter the fields by whichever option you want: “greater than,” “less than,” or “equal to.”
- Export the report using the “Export” option.
| ℹ️ Remember you have two options:Export current page: only what’s visible on the current page will be downloaded. Export all: the entire report will be downloaded. |
| ℹ️ Download reports: If you manage several of your client’s accounts, you’ll be able to select the account for which you wish to download the different reports from the drop-down menu at the top left. Reports from two accounts cannot be downloaded together.If you manage several clients: when accessing the reports you’ll be able to see the information of all your clients, and you can filter by client. |
| ℹ️ Remember that the information that’s downloaded will be the last update that appears. |
Saving and scheduling reports
The Admin allows you to save your customized reports after you pick the columns and filters you want. These personalized reports will appear in the “My Reports” section and make it so you don’t have to reconfigure it the next time you log in.
To do so:
- Click on the “Reports” tab.
- Click on the report you want.
- Customize it with the columns and filters you want.
- Click “Save” then “Save” or “Save As.” This latter will allow you to create a new version of the report without altering the original.
| ℹ️ Saving reports is useful for: Keeping search terms to use at a later time. Retrieving information from a past search. Using, modifying, and changing your searches. |
On the other hand, you can also schedule these reports on a weekly, biweekly, or monthly basis. To do this:
- Click on the three dots next to the report.
- Choose the “Schedule notification” option.
- Choose the reporting period.
- Click “Save.”
| ℹ️ You will receive these reports on Mondays, depending on the reporting period you choose. |