Positioning elements in the scene
Of the five elements you can add to a scene, four can be positioned anywhere within the 3D space visible to the player.
Note: The automatic trigger is the only element that cannot be positioned, as it is designed to activate the action immediately when the player enters the scene.
Additional information: you can expand or collapse the positioning panel as needed to improve the view of the scene. To do this, click the blue arrow on the panel.
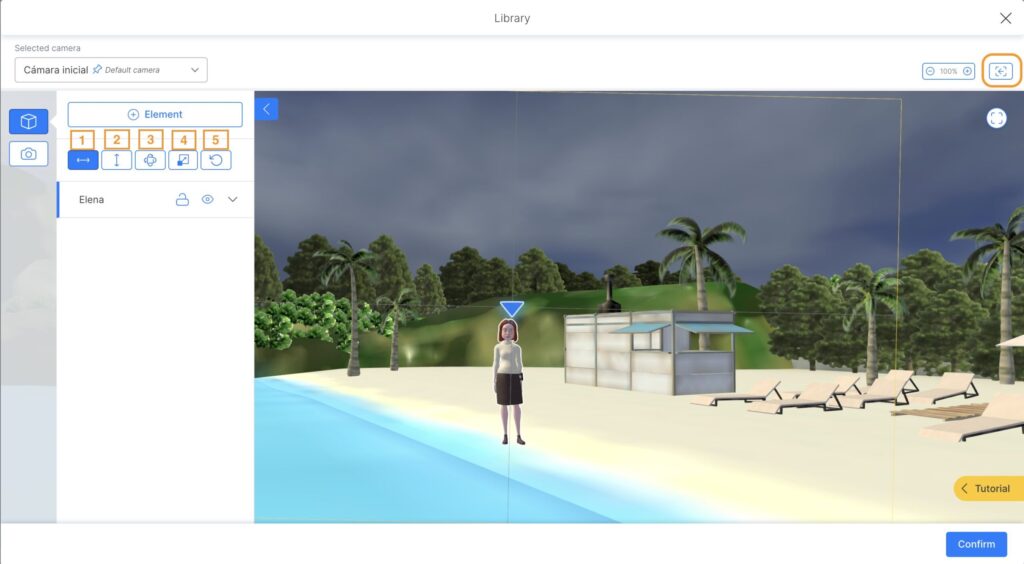
- “Drag” button: this button allows you to move the element along the horizontal axes on the floor. Click the selected element and drag it.
- “Move” button: this button allows you to move the element up or down along the vertical axis. Click anywhere on the element and drag it upward or downward.
- “Rotate” button: when you click this button, a circle with colored lines representing each rotation axis will appear. Click a color depending on how you want to rotate the element. For example, to turn a character to face the camera, click the red line.
- “Resize” button: this button allows you to change the size of an element. Click and drag the green handles to make the element larger or smaller.
- “Reset” button: if you want to start over, click the reset button to return the element to its original position.
If you have accidentally moved the view, use the button that restores the last saved view of the selected camera. This button is located at the top right of the positioning panel.
Positioning a character in the 3D space
- Click the “+ Element” button in the positioning panel.
- Choose the type of element you want to add, in this case, a character.
- Select a character from the library and click “Next”.
- Note: the selected character will appear standing in the center of the scene, at floor level.
- Assign a name to the character.
- Use the positioning buttons on the left side of the panel (as explained above) to place your character in the desired location and adjust its orientation. The first button, used for horizontal dragging, is always selected by default.
- Use the drop-down menu on the left to set whether the character is standing or sitting. You can also change the character’s initial state (active or inactive) and modify its voice for that particular scene.
- Finally, you can also perform these two actions:
- Lock the character in the scene (lock icon).
- Hide the character in the scene (eye icon). Note that this option does not deactivate the element; the character will still appear when previewing the scene.
- Click “Confirm” to save the changes.
Positioning an object in the 3D space
- Click the “+ Element” button.
- Choose the type of element you want to add, in this case an object.
- Select an object from the library and click “Next”.
- Note: the object will appear in the center of the scene, at floor level.
- Assign a name to the object.
- Use the positioning buttons (as explained above) to place the object in the desired location and adjust its orientation. The first button, used for horizontal dragging, is always selected by default.
- Finally, you can also perform these two actions:
- Lock the object in the scene (lock icon).
- Hide the object in the scene (eye icon). Note that this option does not deactivate the element; the object will still appear when previewing the scene.
- Click “Confirm” to save the changes.
Tip: some objects may be very small and hard to move in large scenes. When this happens, use the Resize button or the mouse wheel to make the object larger and easier to manipulate. Once the object is in position, you can resize it back to its correct dimensions.
Positioning a poster in the 3D space
- Click the “+ Element” button.
- Choose the type of element you want to add, in this case a poster.
- Select an image from the library and click “Next”.
- Note: the image will appear with its center point at floor level.
- Assign a name to the poster.
- Use the positioning buttons (as explained above) to place the poster in the desired location and adjust its orientation. The first button, used for horizontal dragging, is always selected by default.
- Finally, you can also perform these two actions:
- Lock the poster in the scene (lock icon).
- Hide the poster in the scene (eye icon). Note that this option does not deactivate the element; the poster will still appear when previewing the scene.
- Click “Confirm” to save the changes.
Positioning a clickable area in the 3D space
The clickable area is a transparent square that you will place over the area you want to activate in the scene (for example, a door or any other object in your environment).
- Click the “+ Element” button.
- Choose the type of element you want to add, in this case, a clickable area.
- Select an image from the library and click “Next”.
- Note: the clickable area will appear with its center point at floor level.
- Assign a name to the clickable area.
- Use the positioning buttons (as explained above) to place the clickable area in the desired location and adjust its orientation. The first button, used for horizontal dragging, is always selected by default.
- Finally, you can also perform these two actions:
- Lock the clickable area in the scene (lock icon).
- Hide the clickable area in the scene (eye icon). Note that this option does not deactivate the element; the clickable area will still appear when previewing the scene.
- Click “Confirm” to save the changes.
Note : you can add multiple clickable areas over the same space to create different flows; see here for instructions on how to activate and deactivate elements.
Configure cameras
As the creator, you can set a specific camera position to give the player a particular view of the scene. You can also move the camera to help position objects without affecting the player’s view in the game.
Camera panel
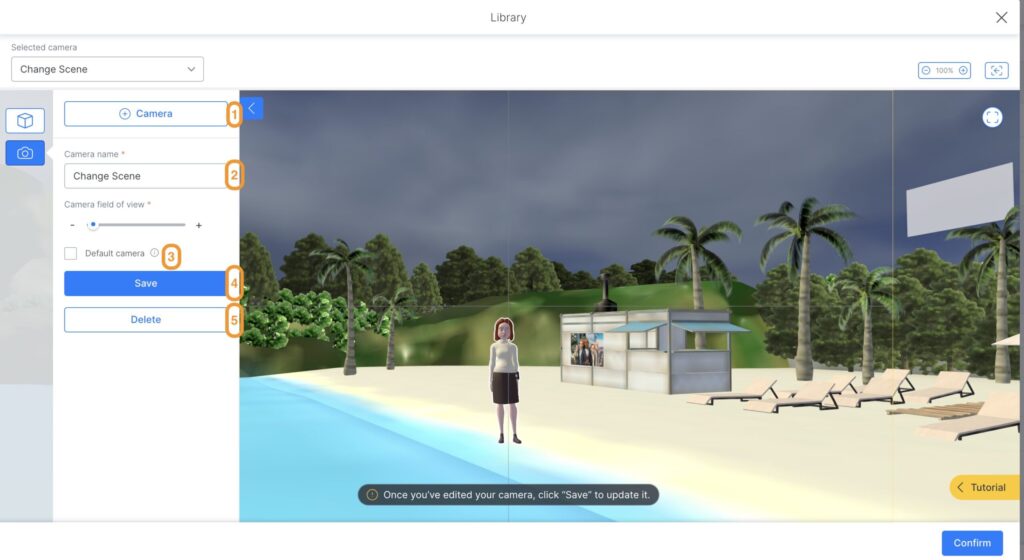
- Create a new camera view.
- Assign or edit its name.
- Set as the default camera.
- Save the current name and view.
- Delete the selected camera view.
Moving and configuring the camera view
Camera navigation in the environment is primarily done using mouse clicks. The available actions and how to use them effectively are described below:
- Rotating the camera
- Hold down the left mouse button and move the mouse in any direction. The camera will rotate around a central point, changing the angle from which you view the scene without moving the position of that point.
- Moving the camera horizontally or vertically
- Hold down the right mouse button and drag the mouse horizontally or vertically. The camera will move side to side or up and down.
- Zooming
- Use the mouse wheel to zoom in or out of the scene.
You can then save the camera view, which allows you to return to it later without having to reposition elements manually.: before confirming the position of an element, click “Retrieve the last in-game view you set” to ensure you are working from the correct view of the scene.
Tip: before confirming the position of an element, click “Retrieve the last in-game view you set” to ensure you are working from the correct view of the scene.
Adding new cameras
To add a new camera, follow these steps:
- In the positioning panel, click the camera icon.
- Click the “+ Camera” button.
- Move the view to the desired position.
- Assign a name to the camera view.
- Click “Add”.
- Click the “Confirm” button at the bottom right of your screen to save your settings.
Note that players will not be able to move or modify the scene view. They will only see the view you, as the creator, have set in the positioning panel.
Note: you can set any camera you create as the “default camera” by enabling this option in the camera settings.
Additional information: you can perform camera changes within the game using the “Change Camera” component or through the “Change Camera” option within the “Dialogue” component.